![]()
⚠ Please do not attempt to follow this guide on a Nintendo DSi or Nintendo DSi XL console at this time! These instructions are currently only for 3DS/2DS consoles, as we are working on a safer and easier way to transfer your account to a DSi console.
Lost access to the console you created your Sudomemo account on? Does that console no longer work? Or, maybe you just want to use your account on a different console? Good news; you can now link your Sudomemo account to other consoles!
Prerequisites
To be able to transfer your Sudomemo account, you’ll need to be able to do the following:
- Login to the account in question on Sudomemo Theatre
- Login to the email account registered to that Sudomemo account
- Transfer a file onto the SD Card you’re using with the console you’re transferring to
- You will need a computer or laptop with an SD Card reader
- If your SD Card is a microSD, you may also need a microSD to SD adapter card
- More tech savvy users can utilize FTPd on the 3DS/2DS to do this instead, though that will not be covered in this article
- You will need a computer or laptop with an SD Card reader
- Access the System Settings on the console you’re transferring to
- Setup your console for Sudomemo — if you haven’t already — by following our setup guide
- For a 3DS or 2DS console, follow this guide
- For a DSi console, follow this guide instead
- Tip: You can stop when you are told to connect to Sudomemo for the first time, as long as you have launched Flipnote Studio and completed the tutorial!
⚠ If you have any Flipnotes saved to the System Memory, following this guide will cause them to be deleted!
Please make sure to create a backup first; you can do this by launching Flipnote Studio, tapping on the wrench in the top-right corner of the screen, and tapping on the right arrow until you see the “Backup Data” button. Tap on this button, and your Flipnotes will be copied to your SD Card.
Step 1 – Getting your MAC Address
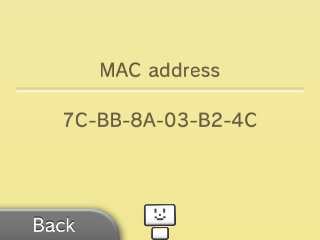
Your MAC address is a unique console identifier that you will need to register your new console with your Sudomemo account. Here’s how to get it on a 3DS/2DS system, after powering it on to the home screen:
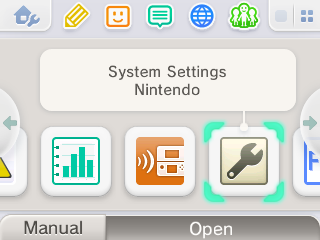
- Launch the System Settings application on your console.
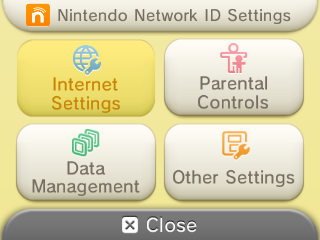
- Tap on the “Internet Settings” button.
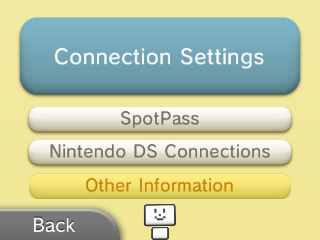
- Tap on the “Other Information” button.
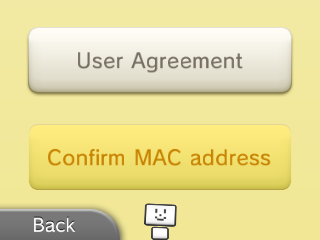
- Tap on the “Confirm MAC address” button.
- Write down the MAC address displayed on the bottom screen somewhere, as you’ll need it later.
Step 2 – Registering your new console
Now that we have your new console’s MAC address, we can register the console to your Sudomemo account:
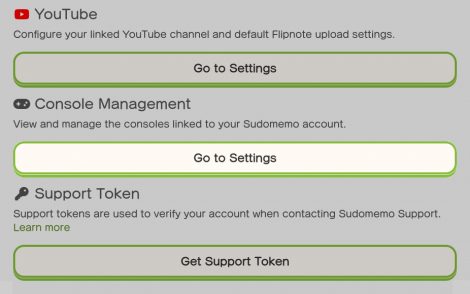
- Head on over to your User Settings.
- Scroll down until you find the settings for “Console Management”, and click on its “Go to Settings” button.
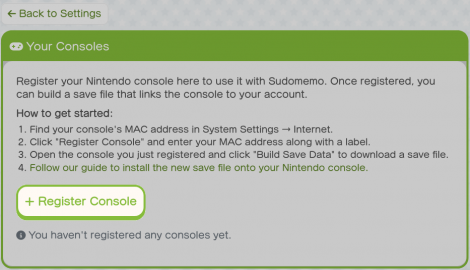
- Click on the “Register Console” button.
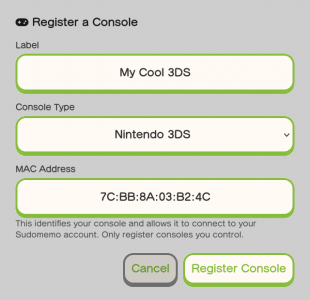
- Give your new console a unique name to help you identify it in the future, select the console type, enter the MAC address you wrote down earlier, and click on the “Register Console” button.
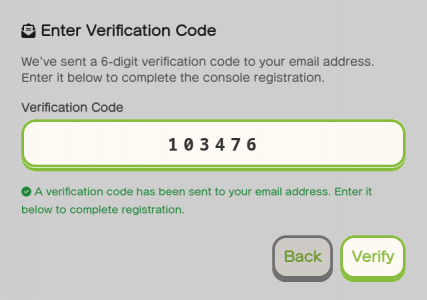
- You’ll be asked to enter a verification code, which should have been sent to your email address. Do so, and click on the “Verify” button.
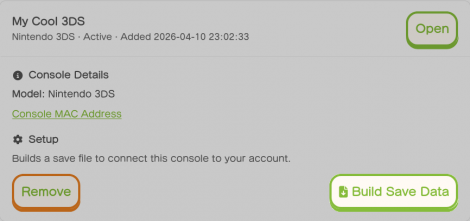
- You should now see your console! Click on the “Open” button next to it.
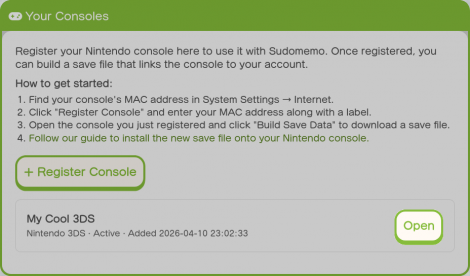
- Now, click on the “Build Save Data” button.
- Read through the warnings and continue until you reach this screen, and then click on the “Download Save Data” button.
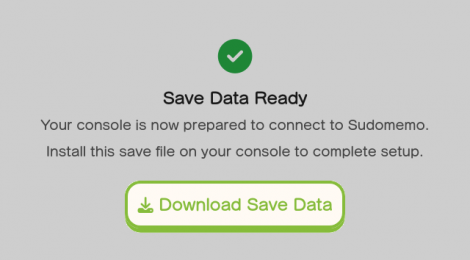
- Your browser will download a “public.sav” file. Copy this file to the root of your console’s SD Card.
Step 3 – Console Setup
Now that you have your save data, you’ll need to install it onto your console.
⚠ This section currently involves manually modifying your NAND! Doing so incorrectly could cause damage to your console, so be careful to follow every step here exactly as directed.
- Launch FBI from your console’s Home Menu.
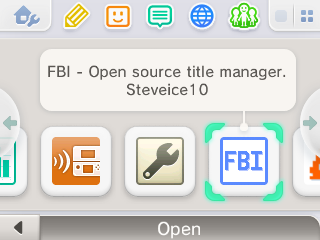
- With “SD” selected, press the A button.
- Find the “public.sav” file you copied to your SD Card earlier, and with it selected, press the A button.
- With “Copy” selected, press the A button, and then press A again when it says “File copied to clipboard.”
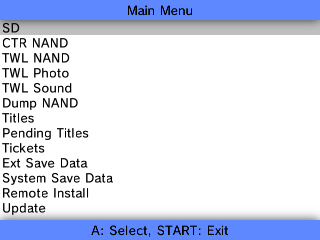
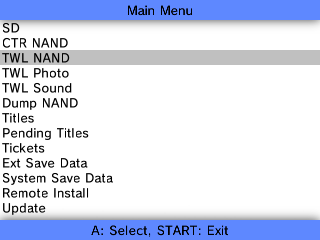
- Press the B button to return to the Main Menu. Then, with “TWL NAND” selected, press the A button. FBI will display a warning message, press the A button again once you have read it.
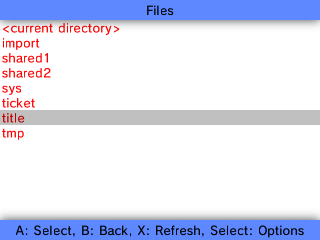
- With “title” selected, press the A button.
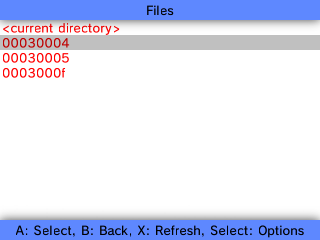
- With “00030004” selected, press the A button.
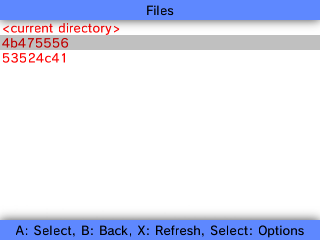
- Depending on which region of Flipnote Studio you had to install on this console, this next step will be slightly different:
– For the Europe and Oceania version of Flipnote Studio, with “4b475556” selected, press the A button.
– For the Americas version of Flipnote Studio, with “4b475545” selected, press the A button.
– For the Japan version of Flipnote Studio, with “4b47554a” selected, press the A button.
- With “data” selected, press the A button.
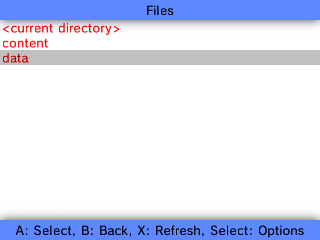
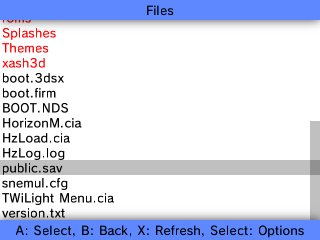
- With “public.sav” selected, press the A button. If you do not see this file here, make sure you’ve fully completed the tutorial in Flipnote Studio.

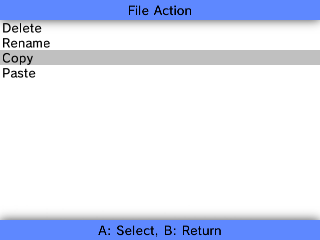
- With “Rename” selected, press the A button.
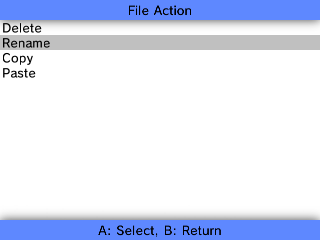
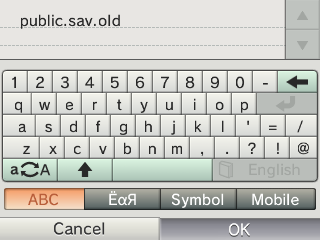
- Rename the file to “public.sav.old”, and then tap on the “OK” button. FBI should say that it was renamed successfully, and when it does, you should press the A button.
- With “<current directory>” selected, press the A button.
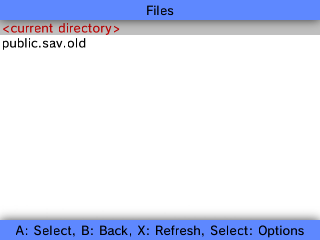
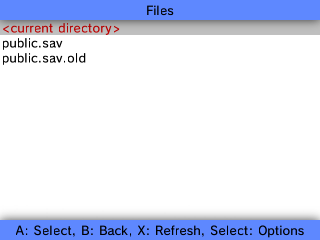
- With “Paste” selected, press the A button. Then, press the A button again to confirm the Paste. After a few moments, the paste should complete, and you can press the A button again.

- If you have done everything right, your bottom screen should now look like this:
- You can now press the HOME button, exit FBI, and launch Flipnote Studio! Tap on the wrench in the top-right corner, and if you see the Flipnote Studio ID from your Sudomemo account, you’ve successfully transferred your account and can connect to Sudomemo!